Thursday, January 18, 2024

Test if RDP (Remote Desktop Protocol) Port is Open using PowerShell

Using PowerShell Test-NetConnection to Test RDP (Remote Desktop Protocol) Port 3389


Open a PowerShell command line by entering into the windows search bar PowerShell and select PowerShell from the items list.  or if your more familiar with access the normal command line, open a command prompt and once opened, type PowerShell and hit enter. You will see your prompt change to PS C:\> 


 Within either the PowerShell prompt or PowerShell in a command window, enter the following command. Change the IP address or computer name to match the system you are testing for RDP (Remote Desktop Protocol) port 3389.  

PS C:\> Test-NetConnection ip-or-computername -Port 3389 

Hit enter, you'll see a green bar across the top for a moment stating "waiting for response".  

The result will look similar to the following. 


If successful, TcpTestSucceeded : True will be displayed on the bottom line of the output results. 

This method can be used to test for other open ports you may be inclined to check if connectivity over the network is available. 


Share/Save/Bookmark

Wednesday, June 15, 2022

Sync Local Active Directory Updates to Azure

Manual Azure AD Connect Syncing 


With an Azure AD connect server on site in your data center or in your server closet, you'd expect syncing to Azure from your local Microsoft AD would be quick. It is for password changes which are nearly instantaneous however other Active Directory property changes to user properties or group membership are not synced so quickly. Microsoft has restricted syncing to the lowest available frequency of 30 minutes.  

Update Azure AD by syncing manually

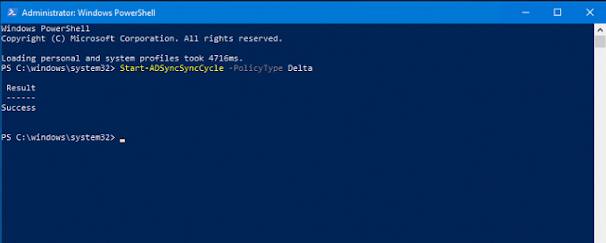
Logon to your Azure AD connect sync server and open a n elavated PowerShell command prompt. As shown in the image, enter the command Start-ADSyncSyncCycle -PolicyType -Delta

                             C:\>Start-ADSyncSyncCycle -PolicyType -Delta

the command when run will output a simple line indicating it ran successfully. If an error appears, search on the keywords or error code. The error will also be logged in the local Azure Sync server's Windows Eventlog.  So look in the windows log for more details if needed.  Common errors are related to  accounts used for the local system to interact with Azure. Issues with the Azure Sync server or other applications on servers and desktops can be resolved with support software. Software for Online computer support is commonly used over the Internet to access systems remotely and give technical support on-demand full access to the remote system to troubleshoot and resolve application problems. Online desktop support software is not limited to desktop computers but can be utilized to access servers remotely and even enable maintaining network devices. 

When the command is run , it will execute immediately and provide a success result as output. the changes on Azure however may take a few seconds to appear.  If the updates made in the local Active Directory don;t appear in Azure after waiting a long 15 minutes, there is another issue. You may try running the command again to accommodate slow local AD replication or force local AD replication. 

Speed-up Local AD Sync 

The following command will speed-up local Active directory replication. i sue it all the time on client domain controllers when i suspect a low replication process is preventing changes or additions to propagate through the domain. 
                                  repadmin /Syncall / APeD


Share/Save/Bookmark


.

Friday, April 29, 2022

No Access to vCenter VAMI UI


      No Access to vCenter VAMI


Share/Save/Bookmark

If the the UI (the vcenter FQDN hostname:5480) loads but you cannot login knowing the password is 100% accurate because for example you can login to the console or using SSH tool like Putty for remote access. 

The UI loads but login attempts fails to VAMI. This could be caused by the application service not being started.


Using the console or putty for access, login and run the following command to start the service. 

              # service-control --start applmgmt 

From the screen shot you could see that the command runs, starts the application management service and indicates the status as STARTED. 

This process worked for me perfectly however, during the process the root user for vcenter had been locked out do to too many failed login attempts. of course because repeated attempts to access VAMI UI, thinking it was the incorrect password or the password had been changed for root access, incorrect passwords were entered. 

The root account will lockout after 3 bad login attempts .  The default timeout before the account unlocks is 5 minutes for the root account of vcenter.  As long as the default has not been changed, wait another five minutes before trying to login even to the console for access or through Putty for access. 

You may also try the following command to reset the root password lock or wait 5 minutes. 

              pam_tally2 -–user=root --reset
                               

You can check if the default is still the lock out value. 

cat the file . 

      /etc/pam.d/system-auth


Look for root_unlock_time=300 in the output . The value of 300 means five minutes so just be patient. 


Sorry I don't have a screen shot for that step.  My session had timed out and it was lost. I know, i could have just re-created the problem to get the screen shot but didn't want to lock my root account again for a screen shot and i had to move on. It safe to say that readers of this post will have the technical experience to manage without that screen capture.  

The following is a great instructional document for installing vCenter vSphere by Dell EMC. Dell EMC PowerEdge Servers Installation Instructions and Important Information Guide


Provide better support to your end users and clients. Whether you're a one person business servicing your clients from small office or home, or a mid-sized to large MSP provider of remote IT services, 4RemoteSupport software for online desktop support  improves the level of service. Most MSP and and individual tech support services provide remote access support using more than one support software. 
Remote access software that requires an agent installed on remote computers for re-connections often costs more than software for online desktop sharing when required only. Agent based keeps a service running and usually incurs a charge per remote desktop. Non-agent based remote desktop client  software permits remote desktop connections when needed and usually and triggered by the remote desktop user. Most providers have both types of support tools used for different situations. 4RemoteSupport online desktop support software doesn't require any software or framework services preinstalled. It works with all browsers. No browser extensions or plugins needed. 


Sunday, February 15, 2015

Command Line to Get Dell Service Tag or HP System Serial Number

Share/Save/Bookmark

Get Dell Service Tag of a Server or Desktop Computer System using just a Command Line


Get a Dell service tag or HP serial number of a server or desktop computer system by using only a command line. Third party utilities or other OEM tools like Dell BMC are not required. Dell Open Manage tools or agents don't have to be installed. On an HP server, Server Manager or HP management agents don't have to be installed. On a Windows or Linux system (Linux command line shown further down in this post), the Dell service tag or board serial number of an HP server or desktop computer system can be displayed by using native Microsoft Widows Management commands. To get and display the Dell service tag of a system with windows installed (Windows XP or higher) simply open a command prompt window, also known as a command window, and enter the following command. 

C:\> wmic bios get serialnumber

Hit enter and on the next line will be displayed the Dell service tag or the HP serial number. Obtaining this information will help looking up the system, server or desktop computer, on the appropriate web-site, Dell or HP, to obtain drivers or other related software and warranty information. 

Alternatively, the following command will provide the same information: 

 C:\> wmic systemenclosure get serialnumber


The same Command line can be used to get the serial number or service tag of a white-box computer system. 

Getting the serial number or tag of a whitebox system is done the same way. Unfortunately, the results may not display the information you need because the manufacture must have populated the field that is queried with the Windows Management command. IN many cases, what will be displayed in place of the serial number or is "To Be Filled by O.E.M." .  


Using only a command line or shell to obtain the system serial number or Dell service tag on Linux

You may have the need to obtain a service tag or serial number of a Linux based computer system server or desktop. The idea and principles are the same With a simple command line display the serial number or service tag. Dell, HP, or IBM tools are not required. The command to get and display the serial number or service tag is different from windows of course but the results are similar. The following command line from a shell works on Linux and Cent OS, other distribution could and will work too but I only tested with these two distributions of Linux.

On Linux Execute the following command from a command shell to get Dell Service Tag

      # dmidecode | grep -i serial      
or 
      # dmidecode -t 1

 DMIDECODE may have to be installed first before the command will be successful. Again, no HP or dell or IBM tools are required.  
       
# yum -y install dmidecode


Friday, March 28, 2014

gpo-automatic-detection-of-intranet-security-warning-we-can't-verify-who-created-this-file
Share/Save/Bookmark

Automatic Detection of Intranet Security Not Working.

Error : Security Warning -  we can't verify who created this file.

Change the following setting on the local machine using local policy or use a GPO to configure this setting for an OU or domain.  What this setting does, and it worked perfectly, was to apply Intranet Security policy for any computer that is on the domain.

The automatic detection has an issue with shortcuts or urls that use the FQDN even if it the local domain. Setting this policy make that Autodetection work. This was a domain with a 2003 domain controller and a windows serer 2008 R2 domain controller. The GPO setting was configured using gpedit on the 2008 server. No additiona administrative templates or kits had to be added. Thi s was with the default admx files found on 2008 R2.

To set the policy setting:
Open gpedit on the Windows 2008 server > User configuration > Administrative templates > Windows components > Internet explorer > Internet control Panel > Security Page
   Enable "Turn on automatic detection of intranet"